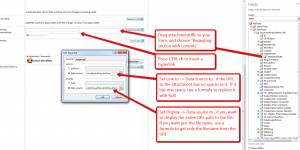
So, you’re customizing a SharePoint list form, and you want to make the File Attachments be read-only at some point. Well, the popular consensus around the interwebs is that this just can’t be done. Create an InfoPath form from scratch and publish to a library yada yada yada. Well I beg to differ. InfoPathians 4:13 says “All Things Are Possible Through Rules And Formulas Who Strengthen Me”.
In your data source, Attachments is a group, with attachmentURL as a repeating field within. So what you want to do is:
- In your Fields pane, click on “Show advanced view”
- Expand “Attachments” group so you can see attachmentURL field
- Click on attachmentURL and drag it into your form wherever you want the links to be
- When presented with options, choose Repeating Section with Controls
- Click inside the Repeating Section and press CTRL + K to add a Hyperlink
- Under Link To, for Data Source, just type a period (this uses the current value of the repeating field, which is the URL to the attachment file
- Under Display, you can either type a period again to use the full path as the display text,
Now if you want to get fancy and only show the filename, instead of the entire URL path, you will have to use a formula to remove the beginning of the URL The URL generally looks like “https://mydomain.com/sitename/List/listName/Attachments/###/filename.ext “, where ### is actually the ID of the list item and will be different with every item. So we need a function that gets the substring AFTER the last /. Since there is no way to get the last occurrence of a string, and the ID changes with each list item, we can hardcode the part up to the ID number, and then get substring after the /, with a formula like this:
substring-after(substring-after(., “https://mydomain.com/sitename/Lists/listName/Attachments/”), “/”)
And voila! Read only access to file attachments! You’re welcome ![]() Oh.. what’s that? The link is broken? Not possible. Really? Damn. Ya, I got that too. Comparing the URL of the file attachment to the URL in the regular control, the only difference I could see was that the spaces in the URL were encoded in the regular control. But doesn’t the browser automatically take care of that? Yes it does! Except when it doesn’t. And in this case… it doesn’t. Crap. Ok, let’s use a formula to fix that then. Translate SHOULD do the trick. How about
Oh.. what’s that? The link is broken? Not possible. Really? Damn. Ya, I got that too. Comparing the URL of the file attachment to the URL in the regular control, the only difference I could see was that the spaces in the URL were encoded in the regular control. But doesn’t the browser automatically take care of that? Yes it does! Except when it doesn’t. And in this case… it doesn’t. Crap. Ok, let’s use a formula to fix that then. Translate SHOULD do the trick. How about
translate(., ” “, “%20″)
Ok great we’re done! Except that it doesn’t work. But when I put use it as a the formula for a Calculated Value it displays the URL perfectly! Crap again. Well, I was able to get it working for a URL that had only a single space in it by simply concat-ing the string before the space, to “%20″, to the string after the space like this:
concat(substring-before(., ” “), “%20″, substring-after(.,” “))
I will update this post if I come up with a solution for multiple spaces (or feel free to post them in the comments if you have one!)


Hello Vince.
I came across of your site searching for a solution for my test SharePoint.
I like your beer idea.
I have a question about the InfoPath if you have 1 min to help/explain me.
I have a custom list in SharePoint: Fields: Column1, Column 2 (for attachments).
So basically: for create new Item in the list I will need to add the name and then upload the file. (Microsoft word document.)
I have created 1 more VIEW form with InfoPath for specific list.
When someone will click into the list item, the new view form will show up. Easy to do it until now.
What I want to do is that: In the new VIEW form (create on InfoPath) I want to embed/show the word document attachment witch usually is just a page so the people don’t have to click to download and edit the file. I basically want to embed the content of the Microsoft Word document on the new VIEW form created on InfoPath.
Thanks in advance,
Crizz
Hi Crizz…. I know it’s about half a year too late (so sorry), but I haven’t seen an out of the box way to do what you’re trying to do. A better solution might be to try to capture the information on the Word document as data in a list and showing the list item columns on the form. Or even uploading an image instead of a Word doc, and then displaying that image.
Thanks for sharing your thoughts on Painting
Tips. Regards
Where are you putting the formula? I don’t have the option.
Hey Jason, if you click on the picture in my post, you will see detailed instructions on how to add the hyperlink and where to put the code. You just have to type it into the text box next to “Data Source” in both the Link To and Display sections. Let me know if you still have trouble.